
# Administration
In this section, you can :
- create users, groups, organisations
- define new media rules
- create steps and associate media rules to those steps
- define rights to access episodes and steps per organisations
- set project specific parameters

# User creation
The users button will display the current list of users and allow you to create, edit and delete users.
To create a new user just hit the New button.
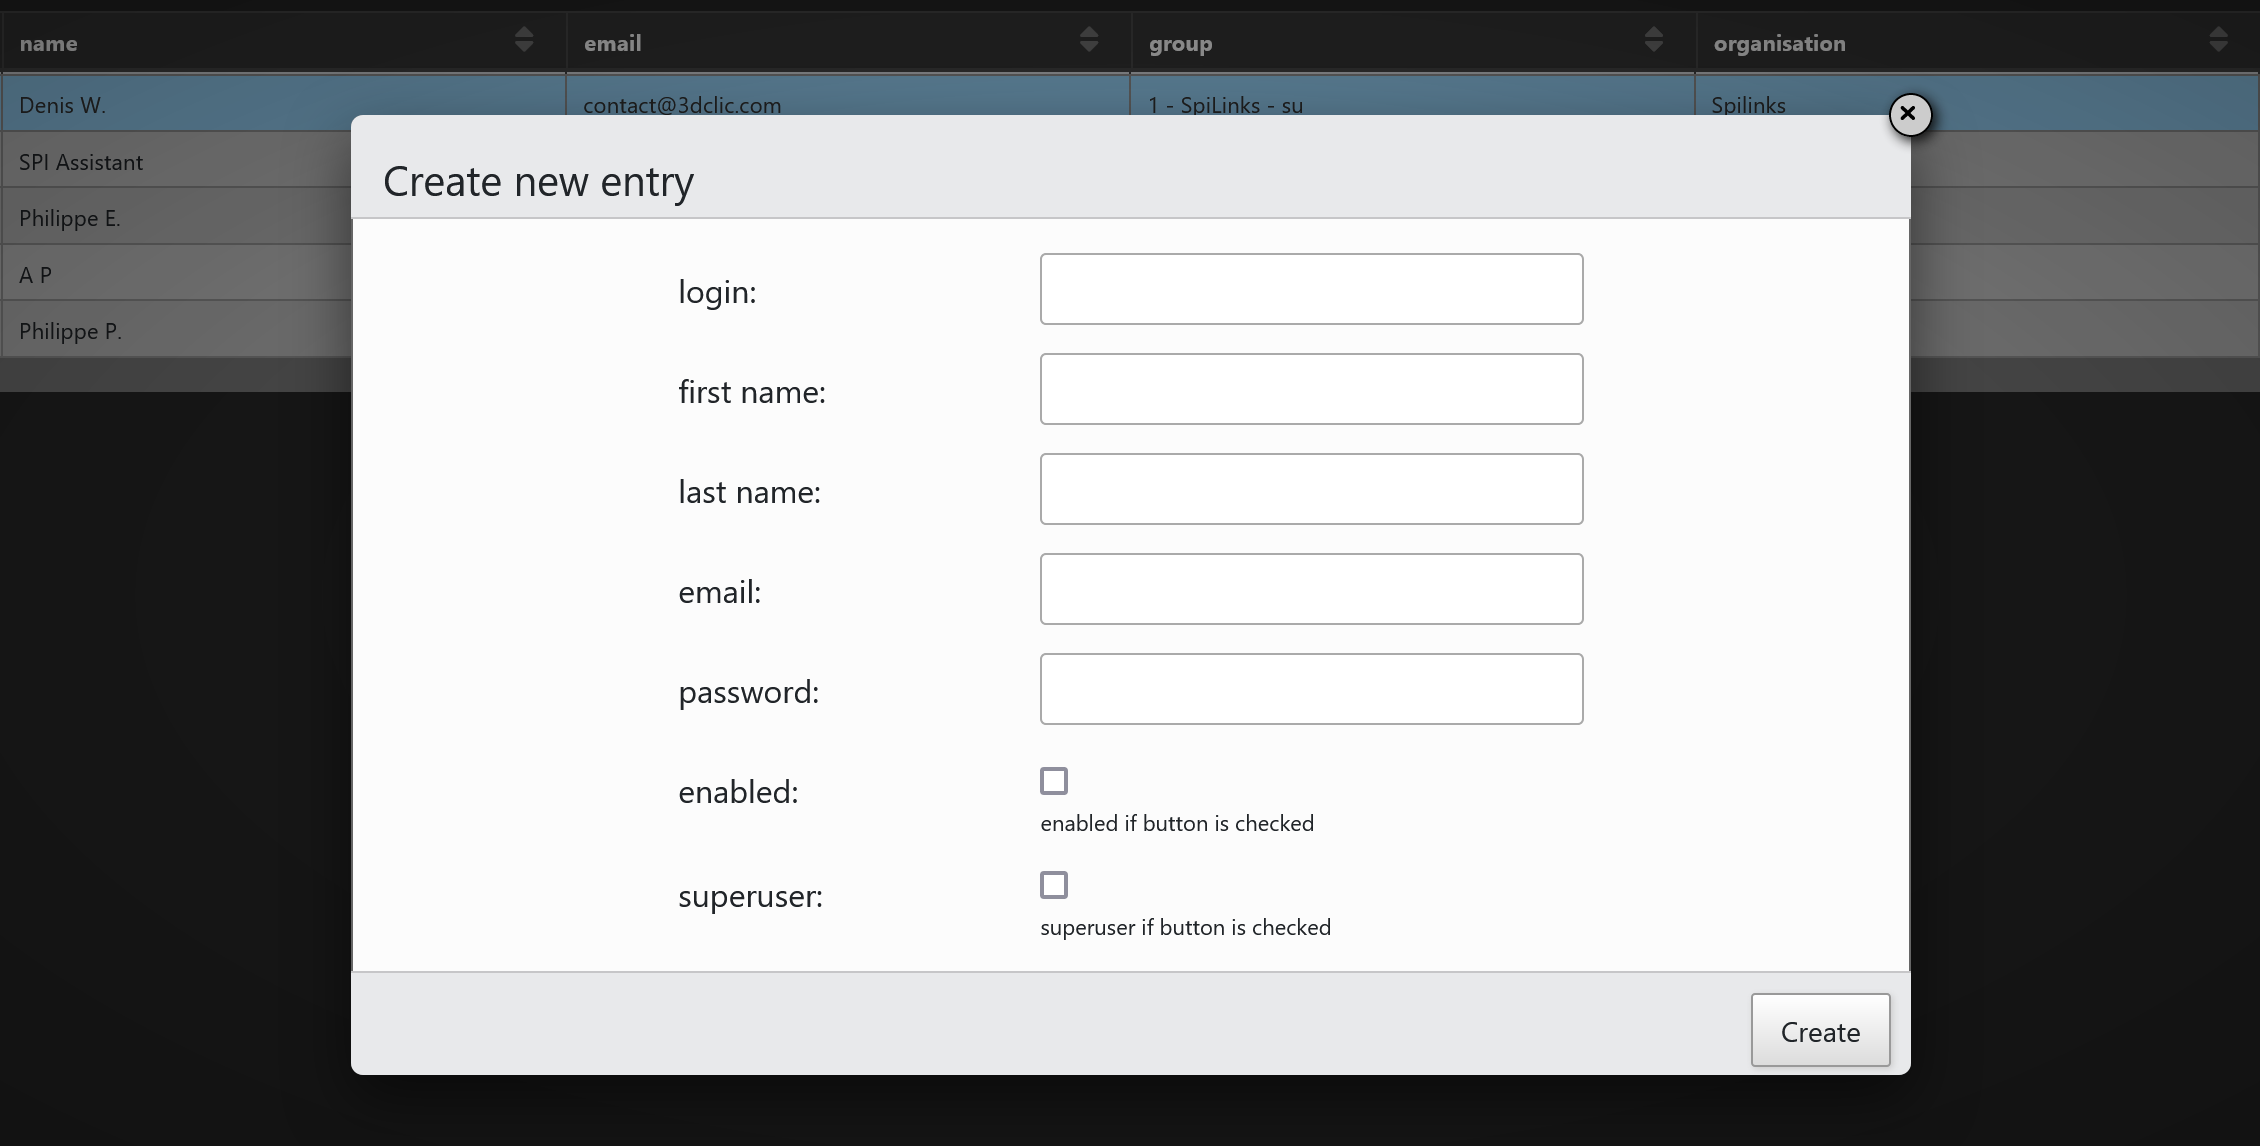
You just have to fill in the different fields and hit the Create button to add a new user. Once you created
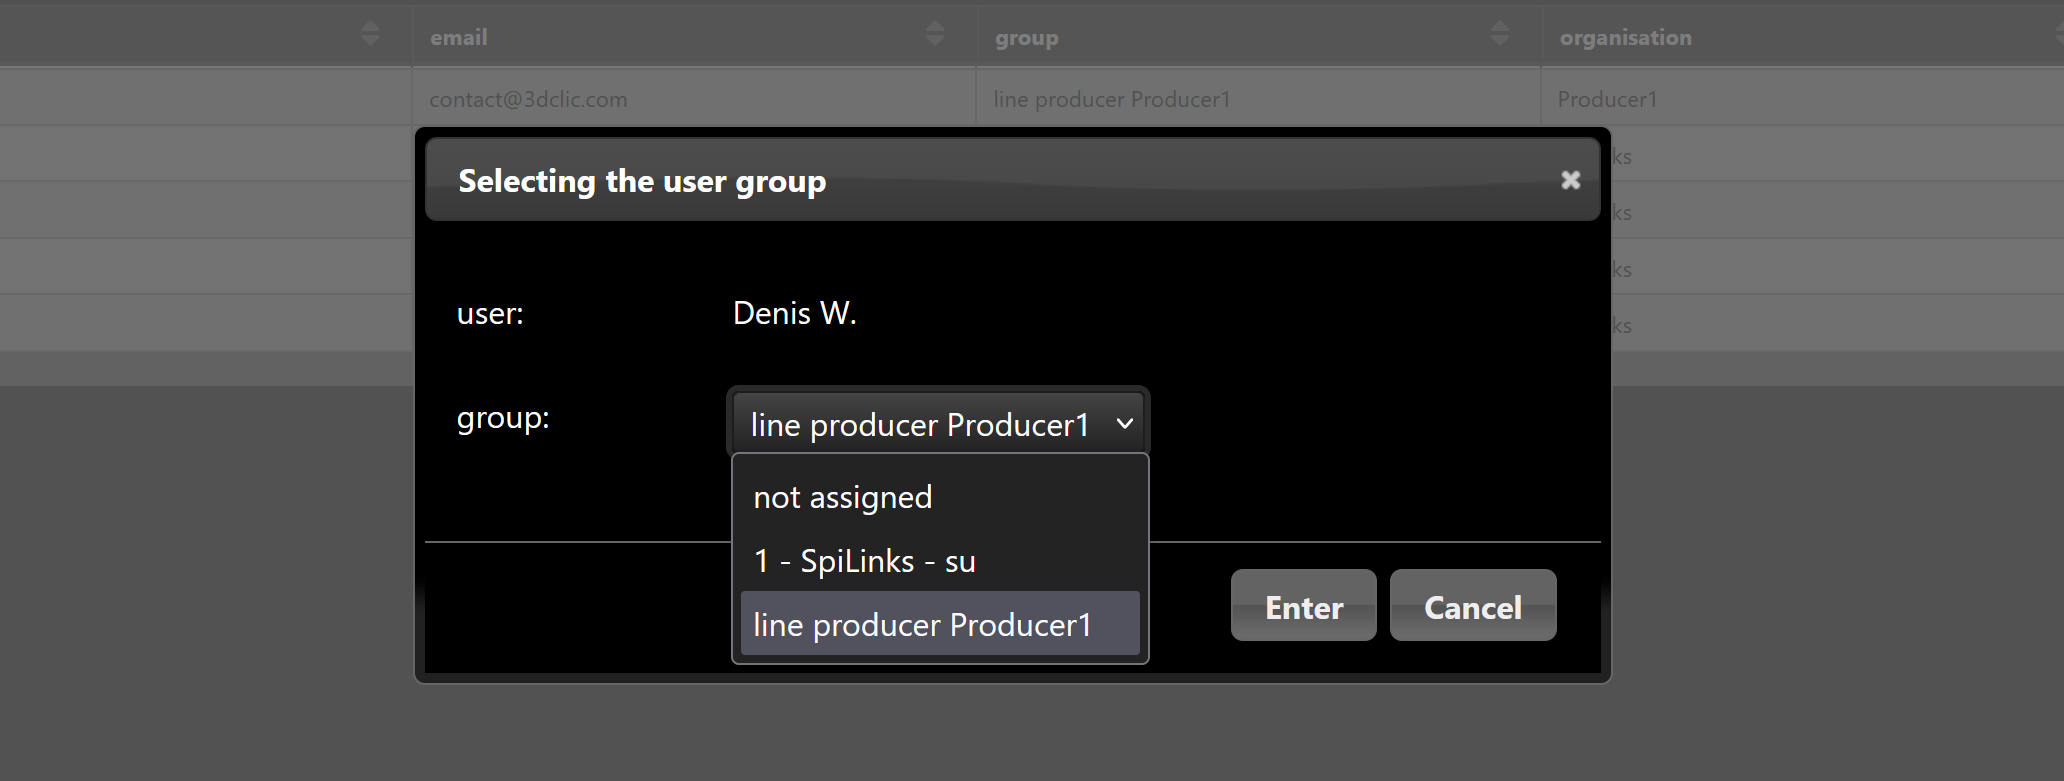
a user, you may assign this user to a group. Assigning a user to a group will define the permissions of this user.
# Organisation creation
The organisations button will display the current list of organisations. This is where you create new organisations
and also where you associate media rules to steps.
To create a new organisation just hit the New button.
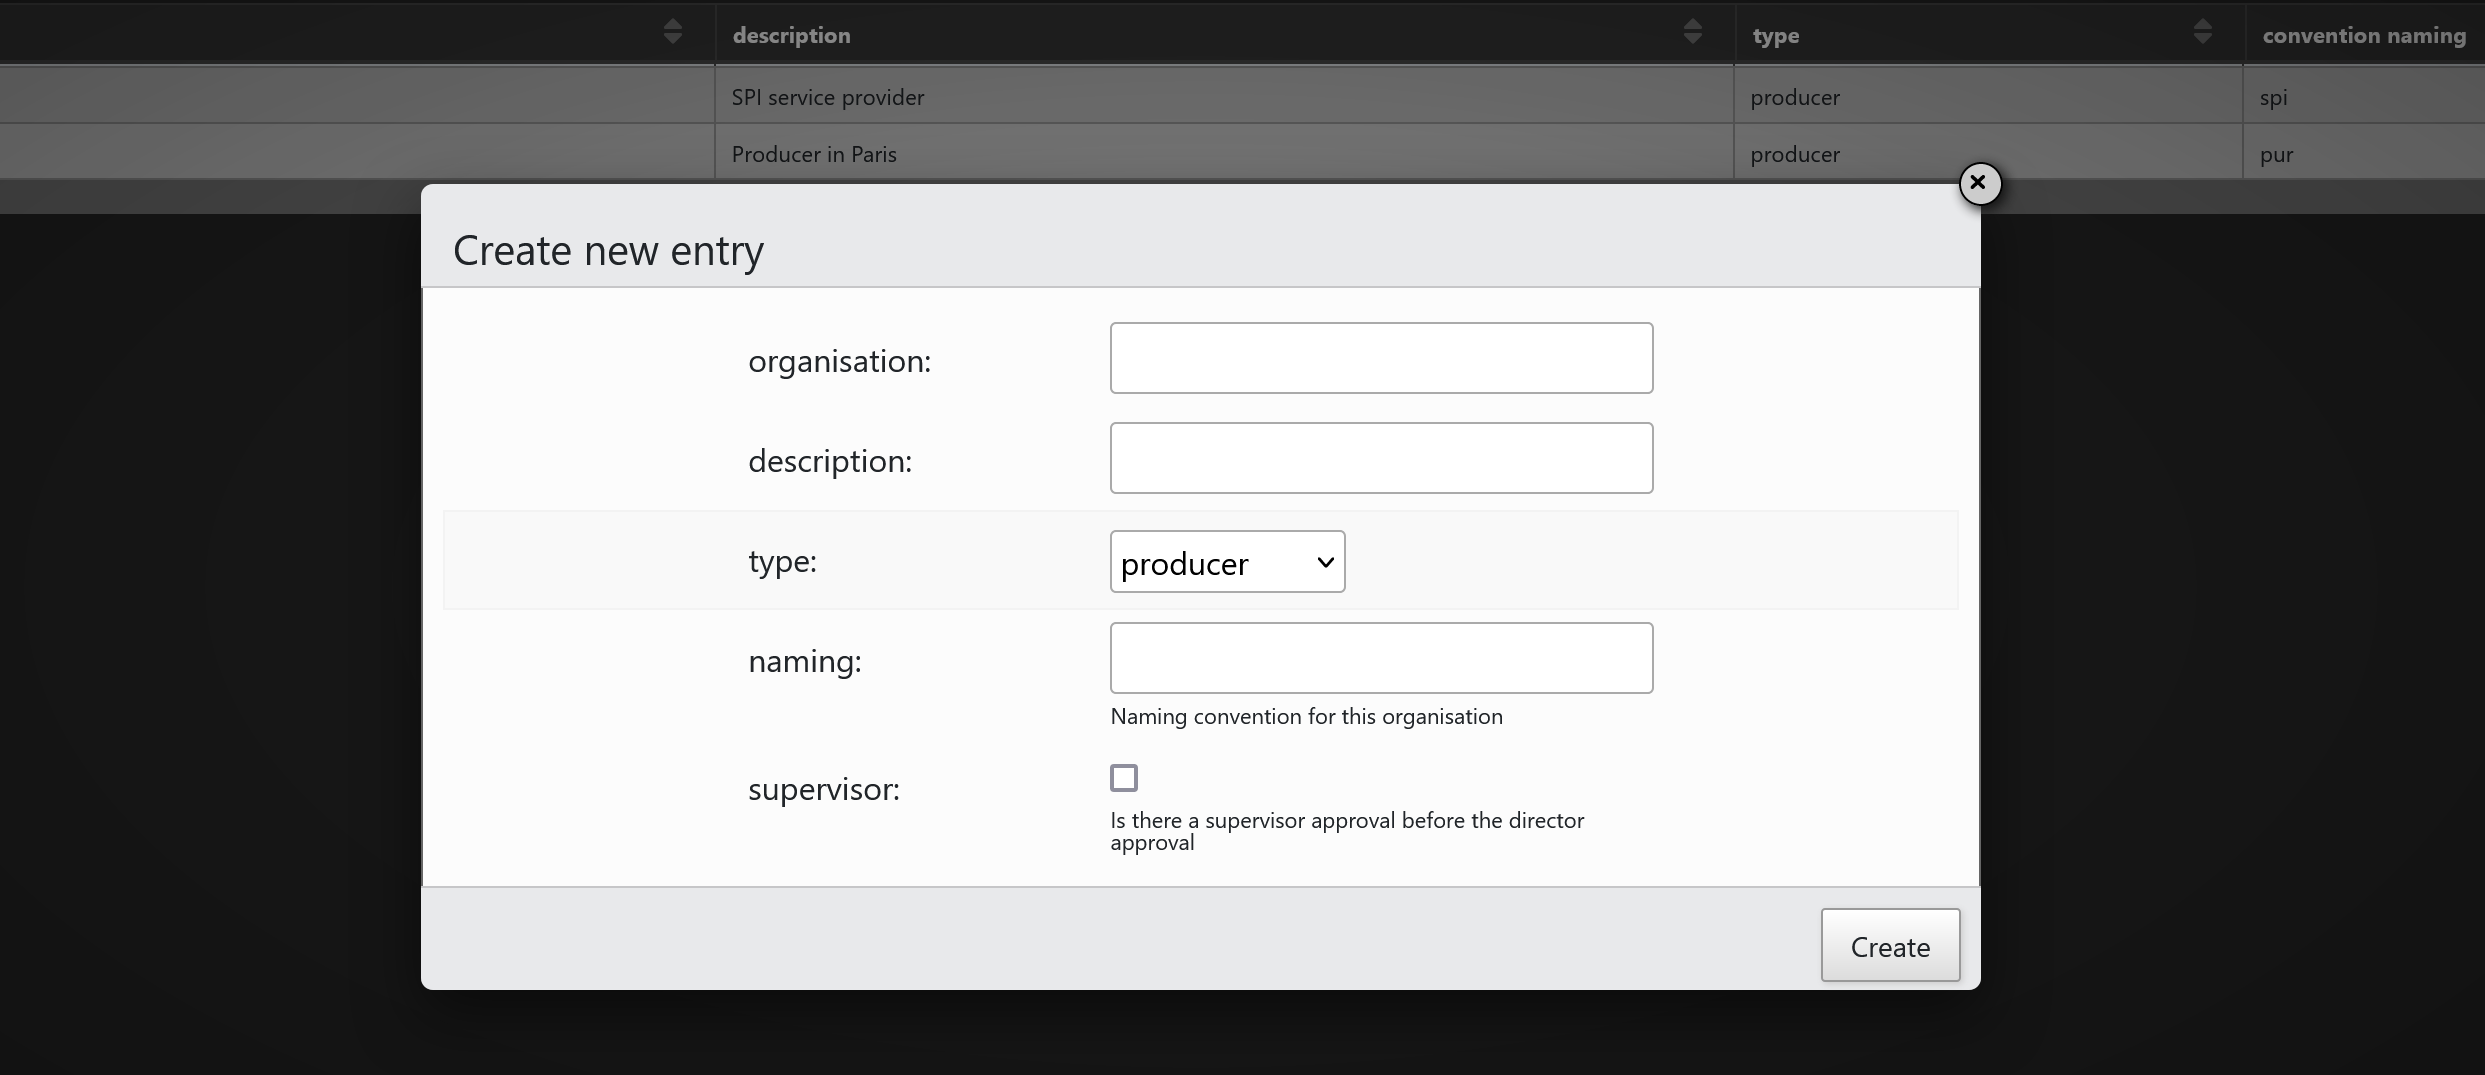
The naming convention will be used when you checkout an element in SPI.
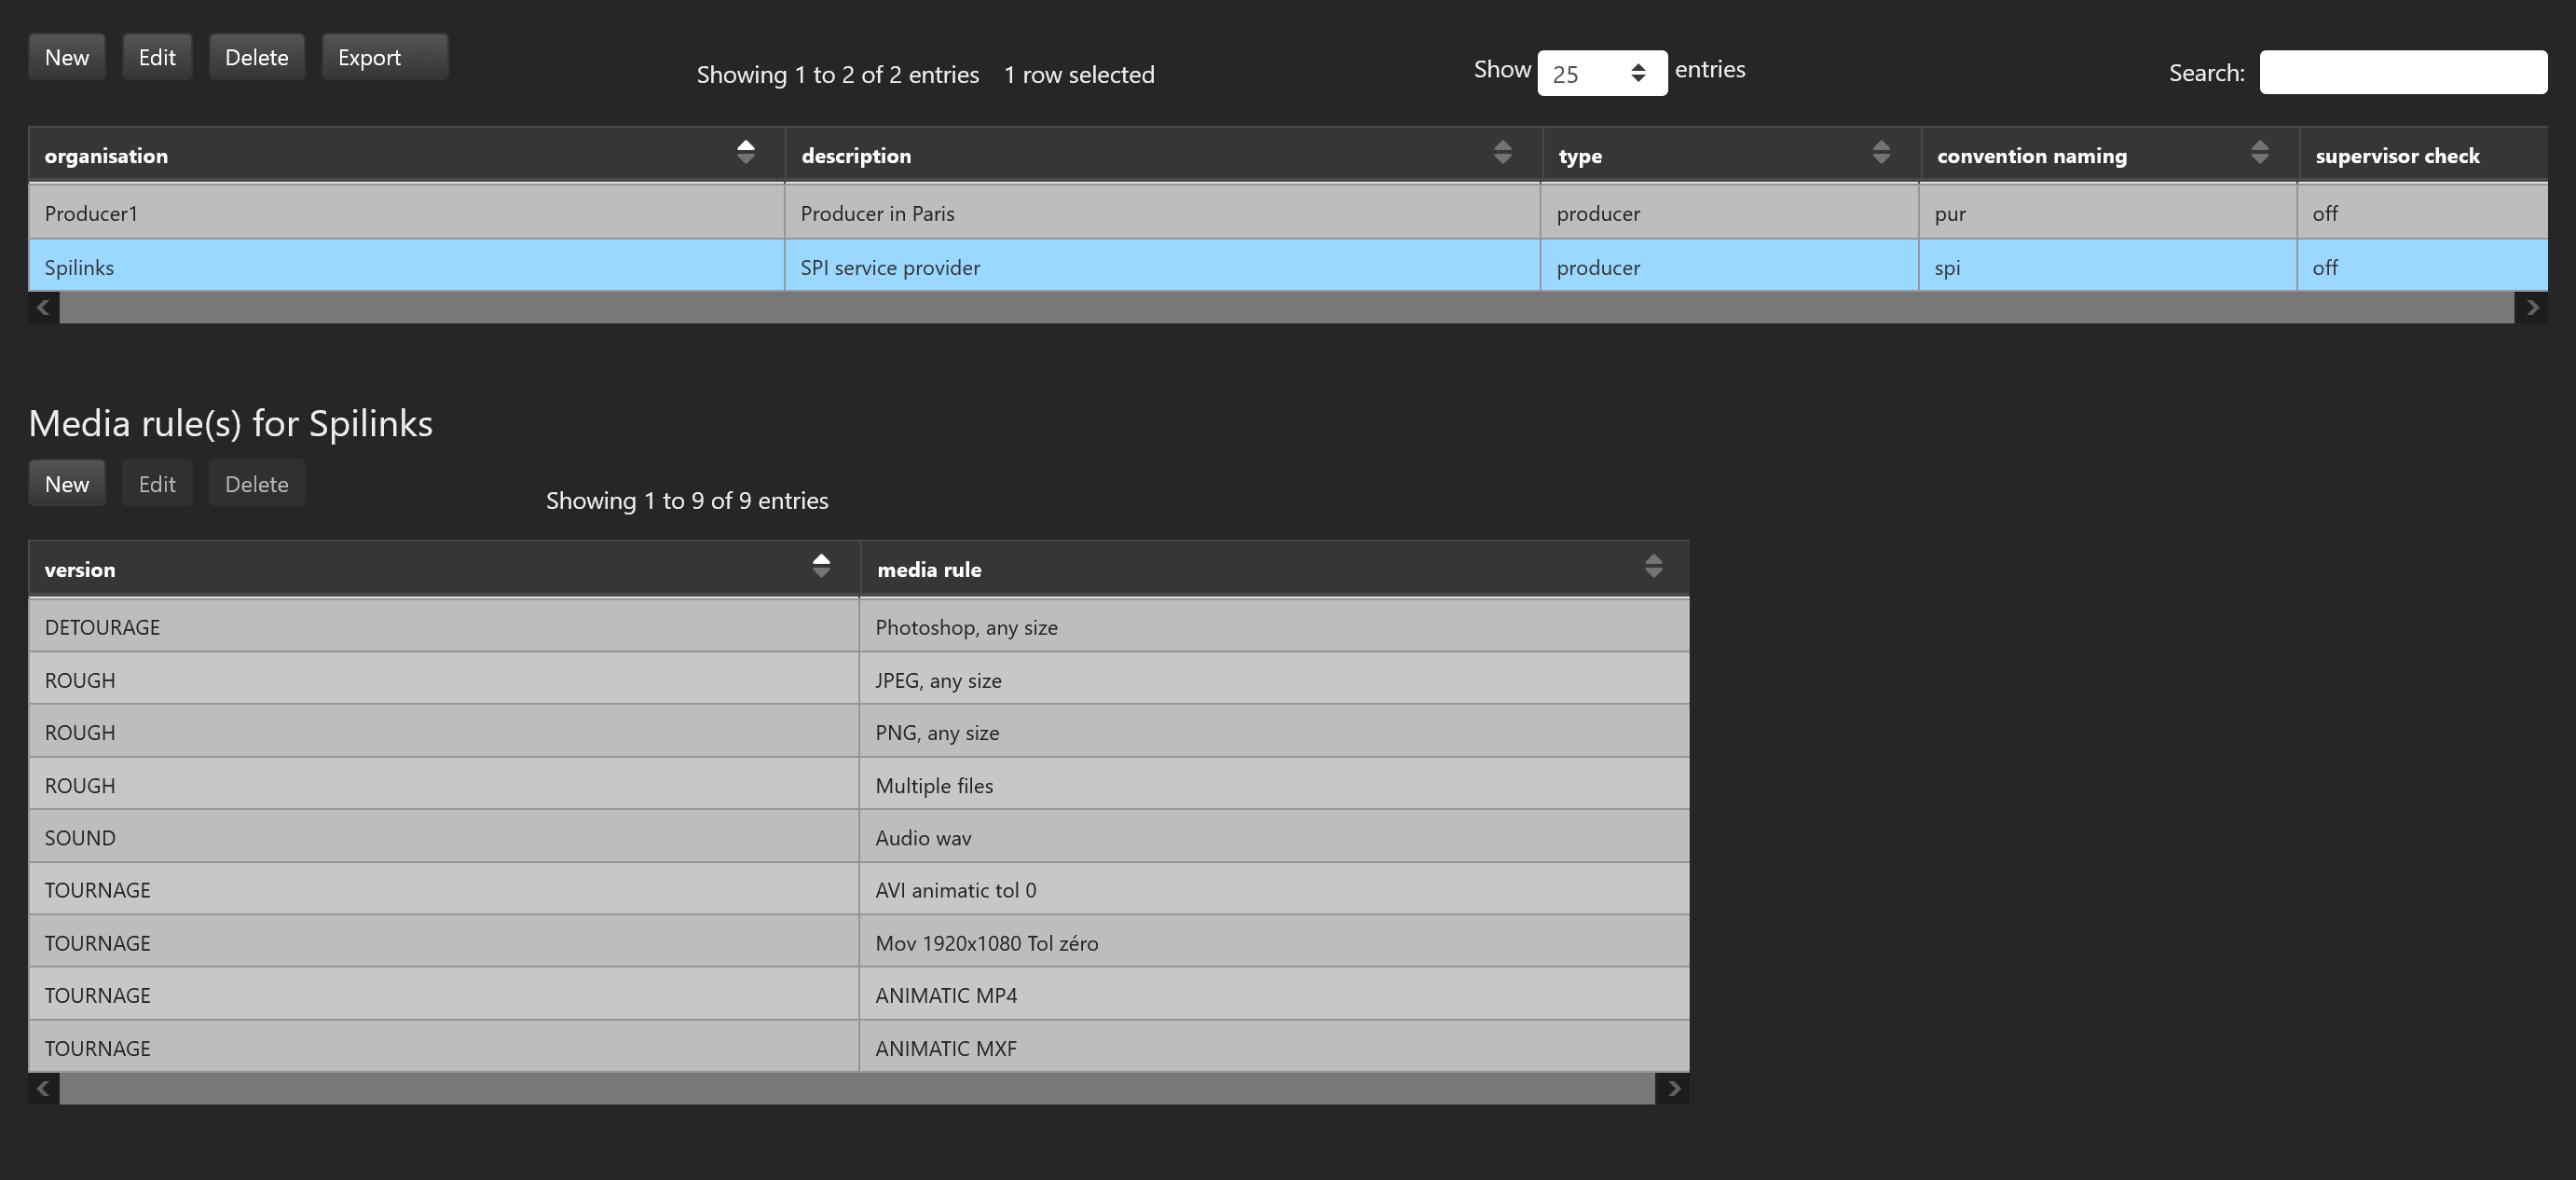
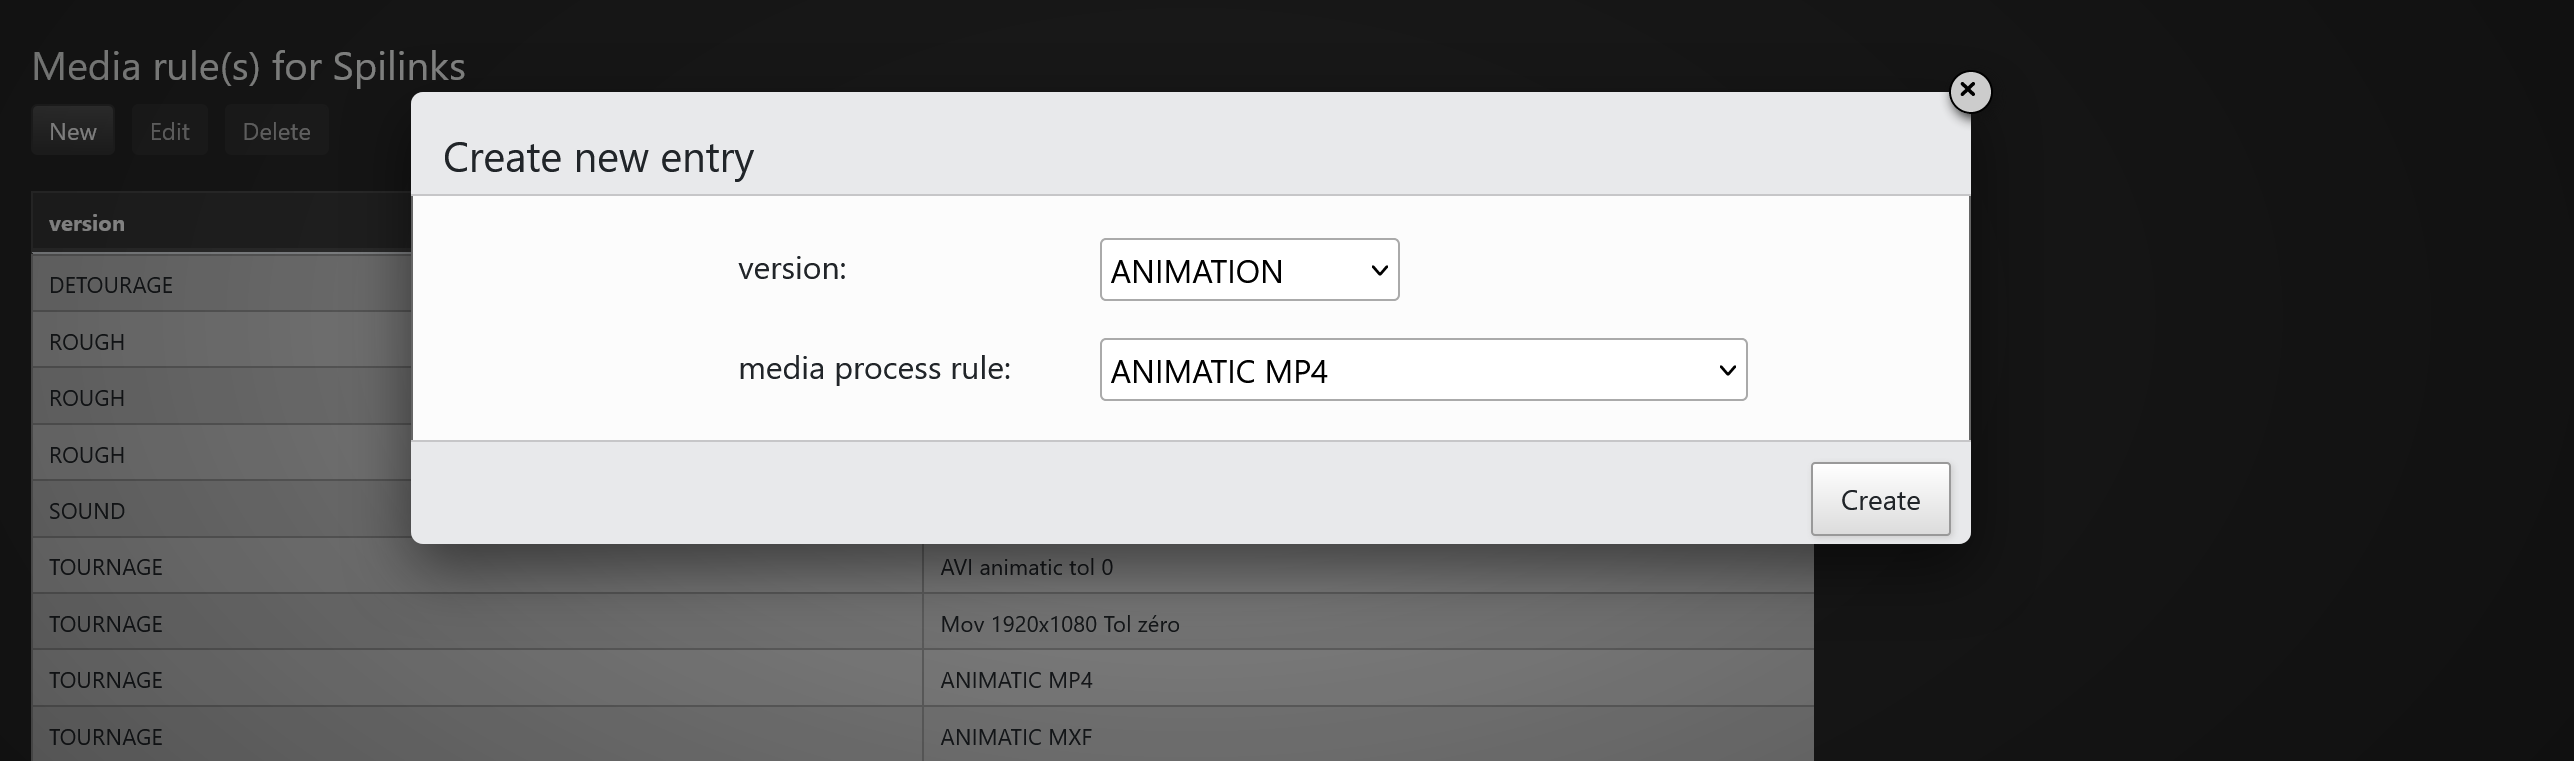
If you select an organisation. The current list of media rules per version/step will be displayed.
If you want to add a new media rule for a version, just hit the New (media rule) button and select
your media rule and version.
# Group creation
Groups are used to define permissions and rights for SPI users. The groups button will display the current list of groups.
It will allow you to create new groups and to define for each group its permissions.
To create a new group just hit the New button.

If you want the daily reports to be sent to all members of this group, just check the email report checkbox . Daily reports concern the number of elements submitted by a studio and the number of elements reviewed by a producer on a daily basis. If you want members of a group to be informed whenever an invalidation or a deletion is made, just check the email alerts checkbox.
Once a group has ben created, you can display and set its permissions by selecting the group.
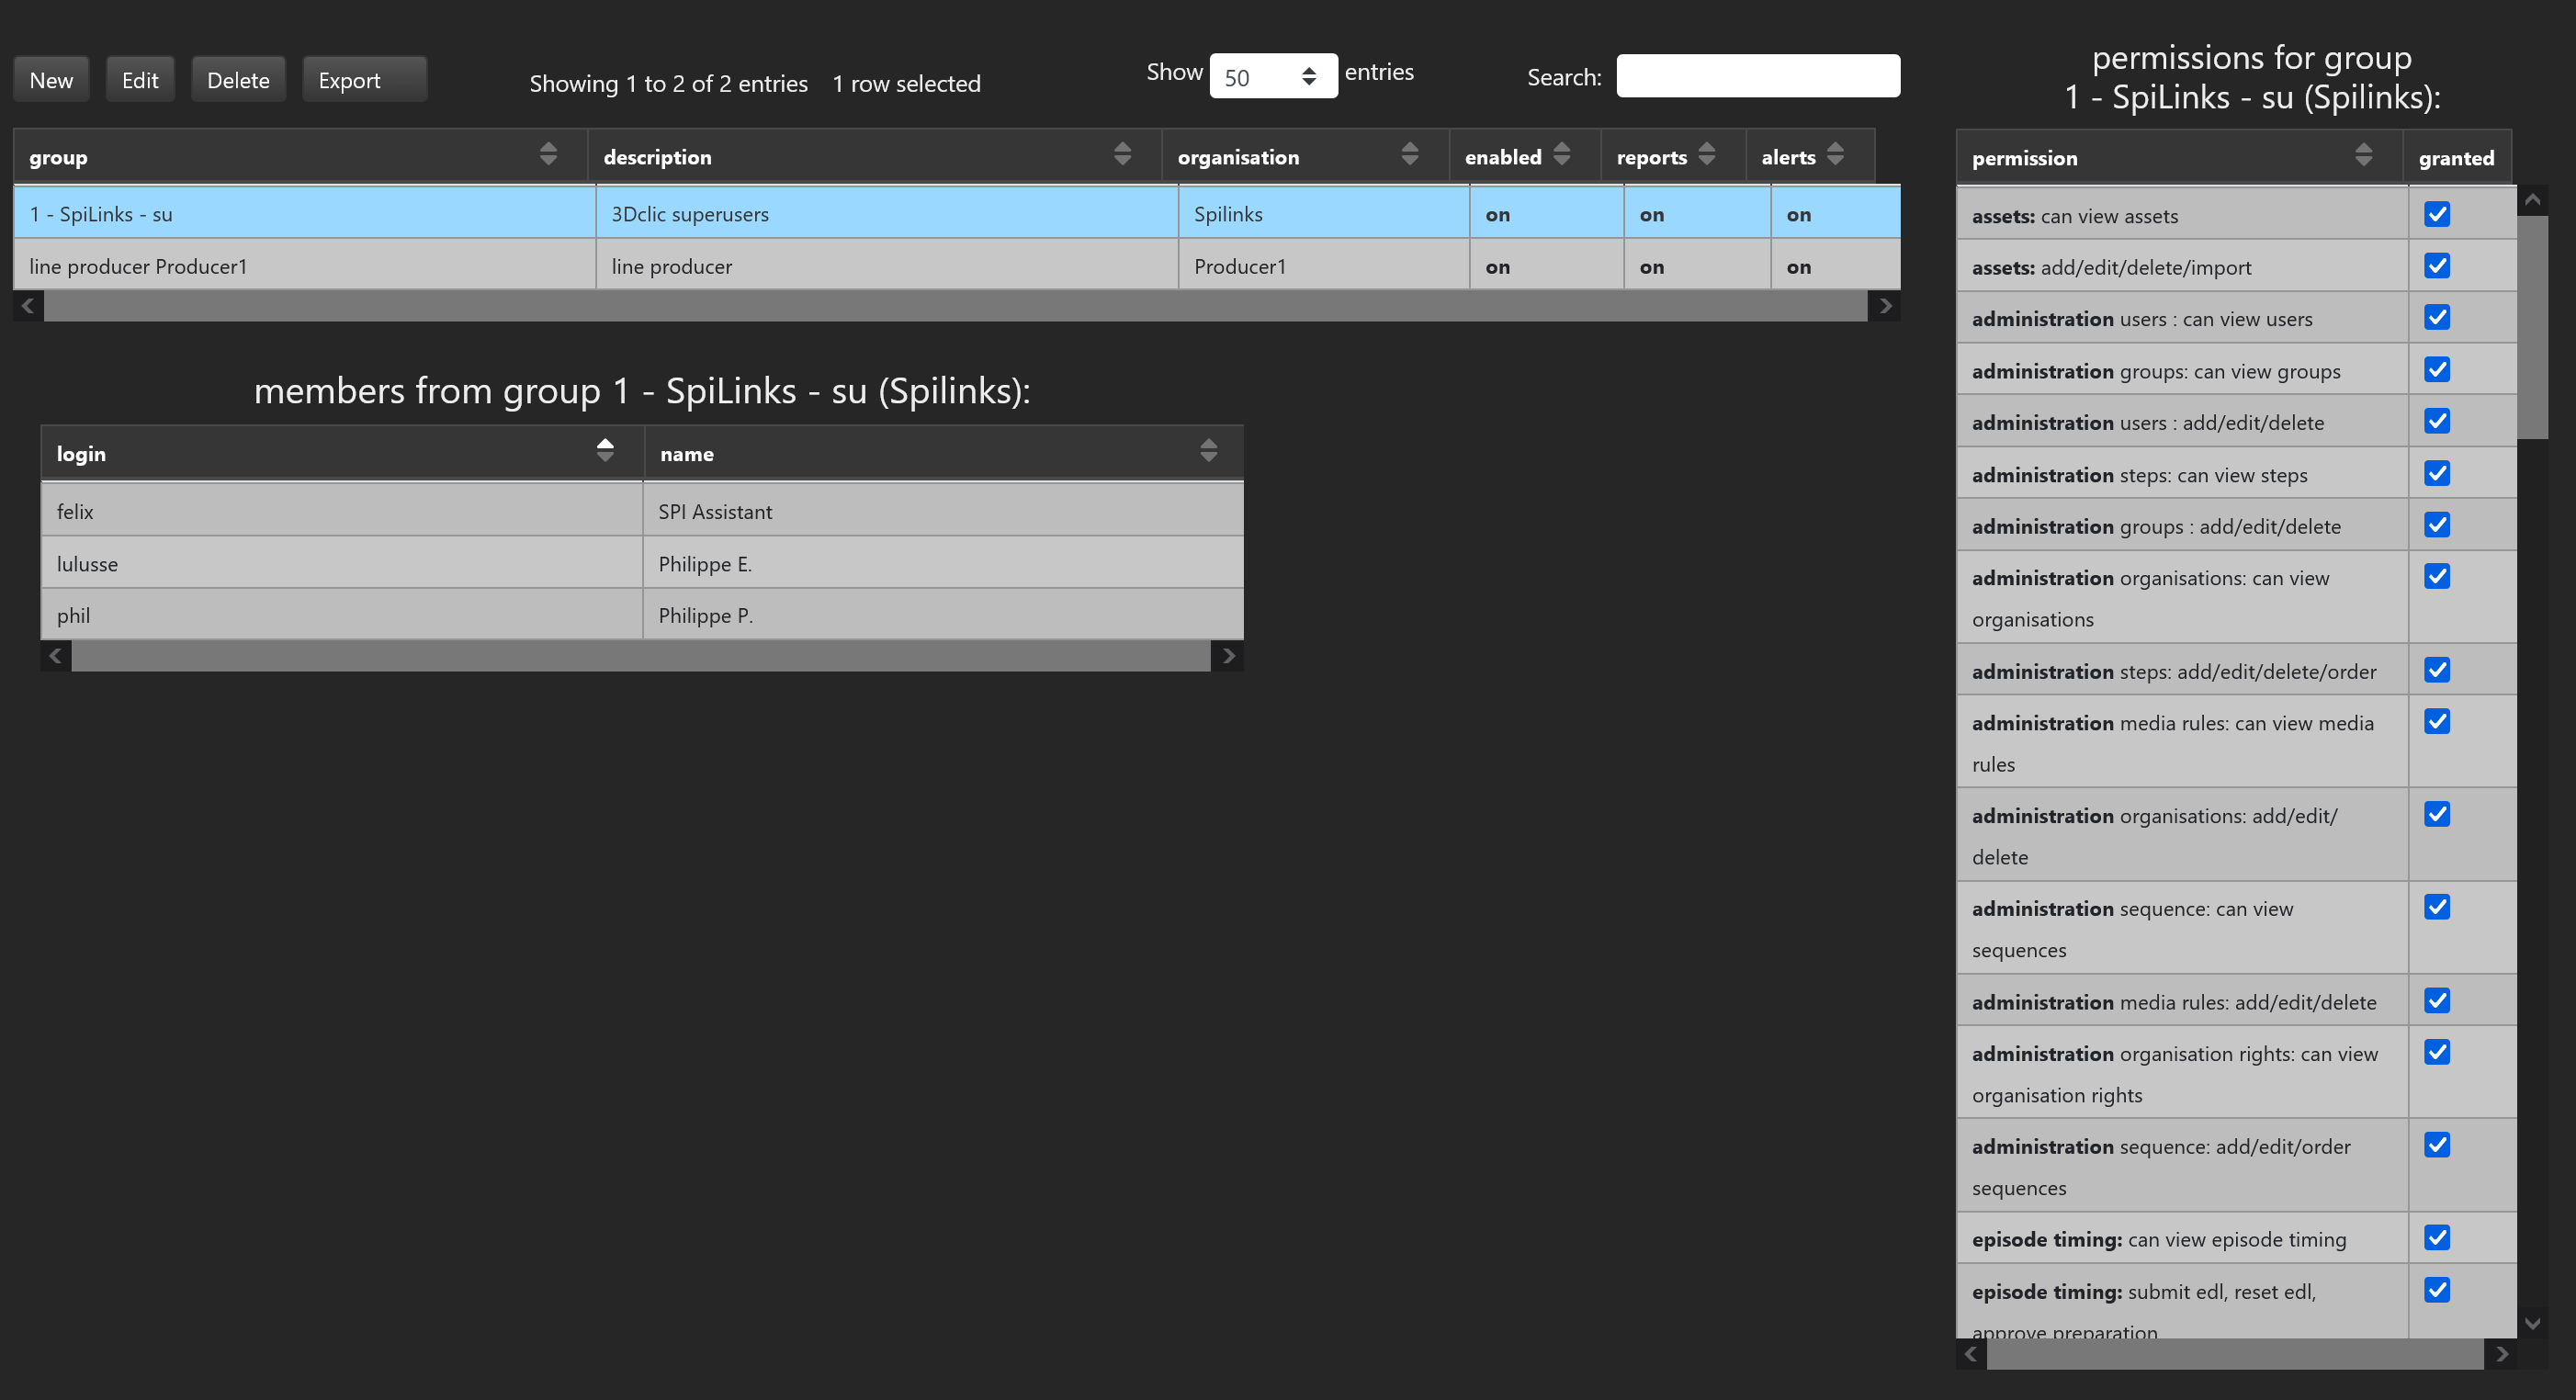
You then can grant the permissions you want for that group.
# Step creation
The steps button will list all existing steps and will let you create and edit steps as well.
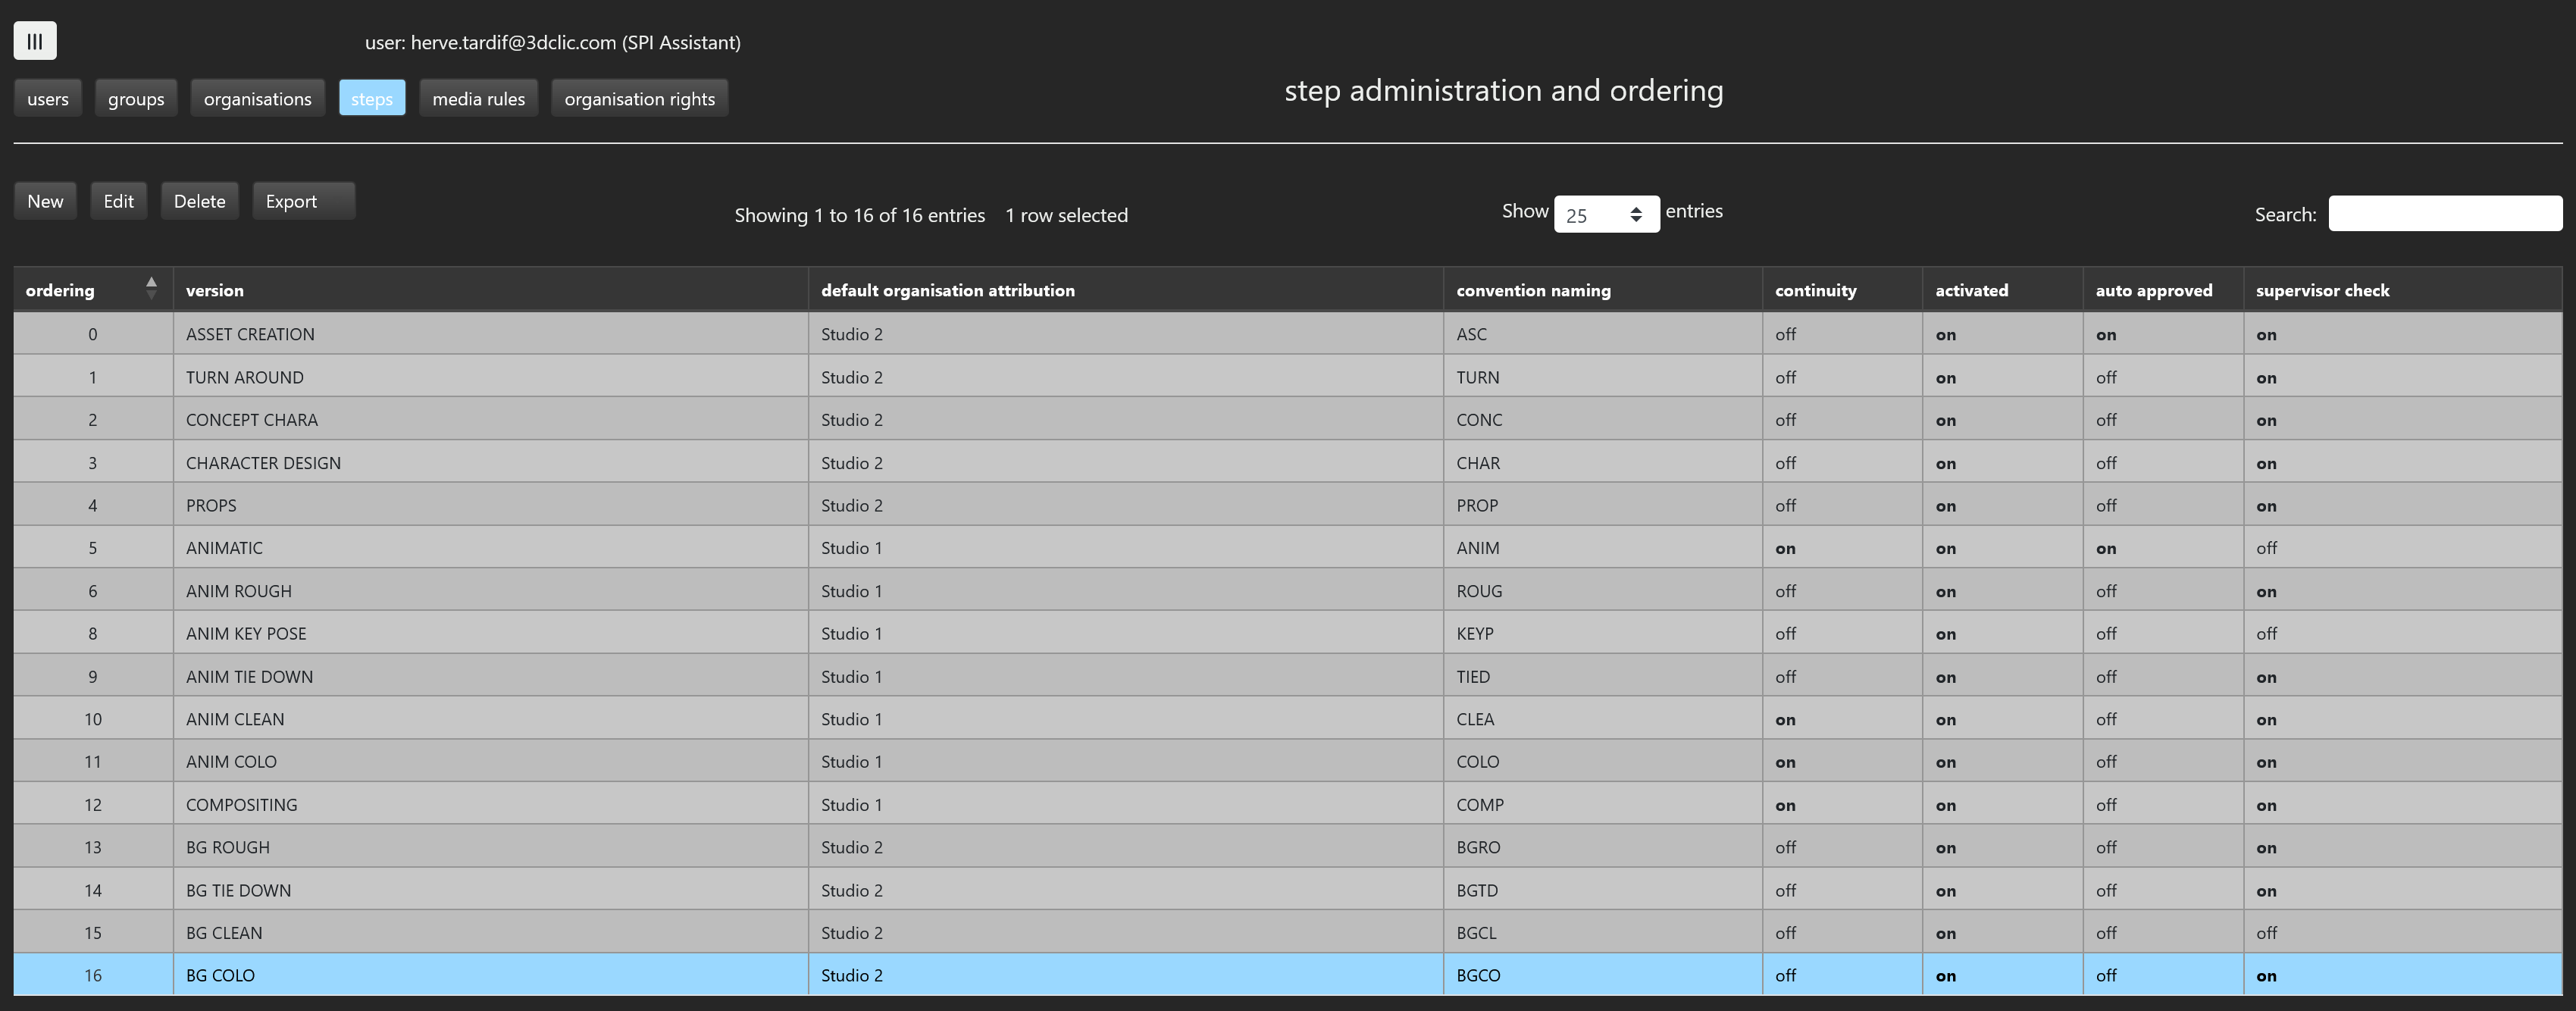
The New button allows you to create a new step. Once hit, you will specify the following parameters:
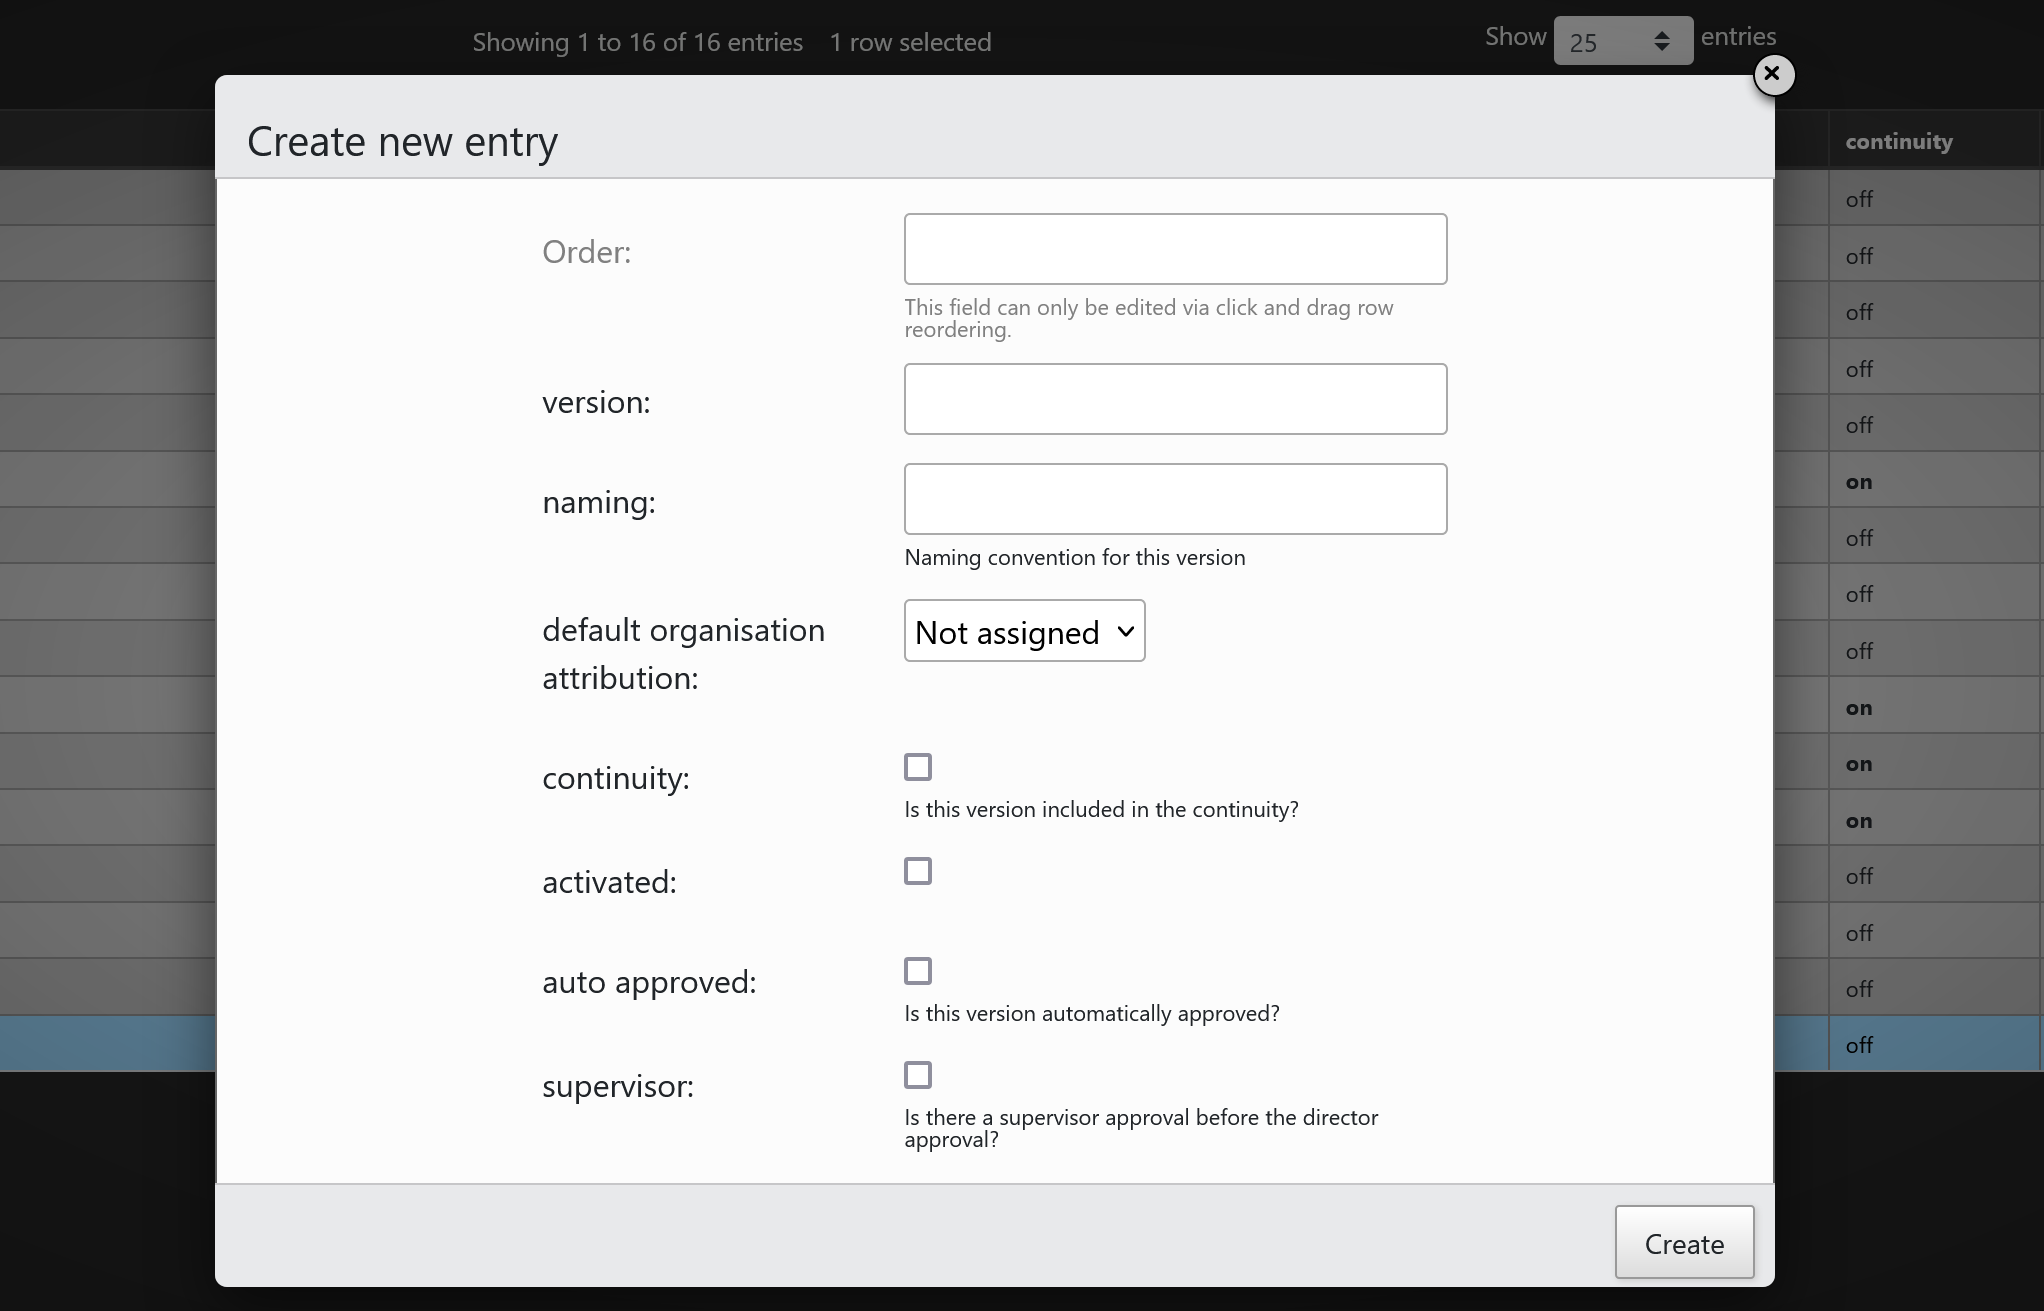
The version name is the name that will appear in the interface. The naming is the naming convention that will be used when you download elements at this step. The default organisation attribution is the organisation this step will be assigned to by default, you may override this in the task assignment page.
The continuity checkbox will let you decide if this step will be taken into account when building continuities. If you want this step to be automatically approved, you will check this box. Root steps like animatic and asset creation usually have this box checked.
Finally, the supervisor checkbox will be checked if you want to have a double approval scheme for that step that is to say an approval by the supervisor followed by an approval by the director.
The ordering field indicates in which order the steps are displayed in the list of steps or in the step pull down menus all over the SPI user interface. This field will be automatically set through click and drag row reordering on the list of steps, hence there is no need to set it when creating or editing a step.
# Media rules creation
This is where you define media rules. Once a media rule has been defined, you can associate this media rule to a step which basically means that all media delivered for that step will have to follow that rule. Associating a media rule to a step is done in the organisation creation section.
TIP
You can associate several media rules to a single step. For example, if you are expecting either photoshop or jpeg images for a given step, you will associate a psd media rule and a jpeg media rule to that step.
SPI proposes a set of predefined rules by default but you can create your own media rules on top of that existing set.
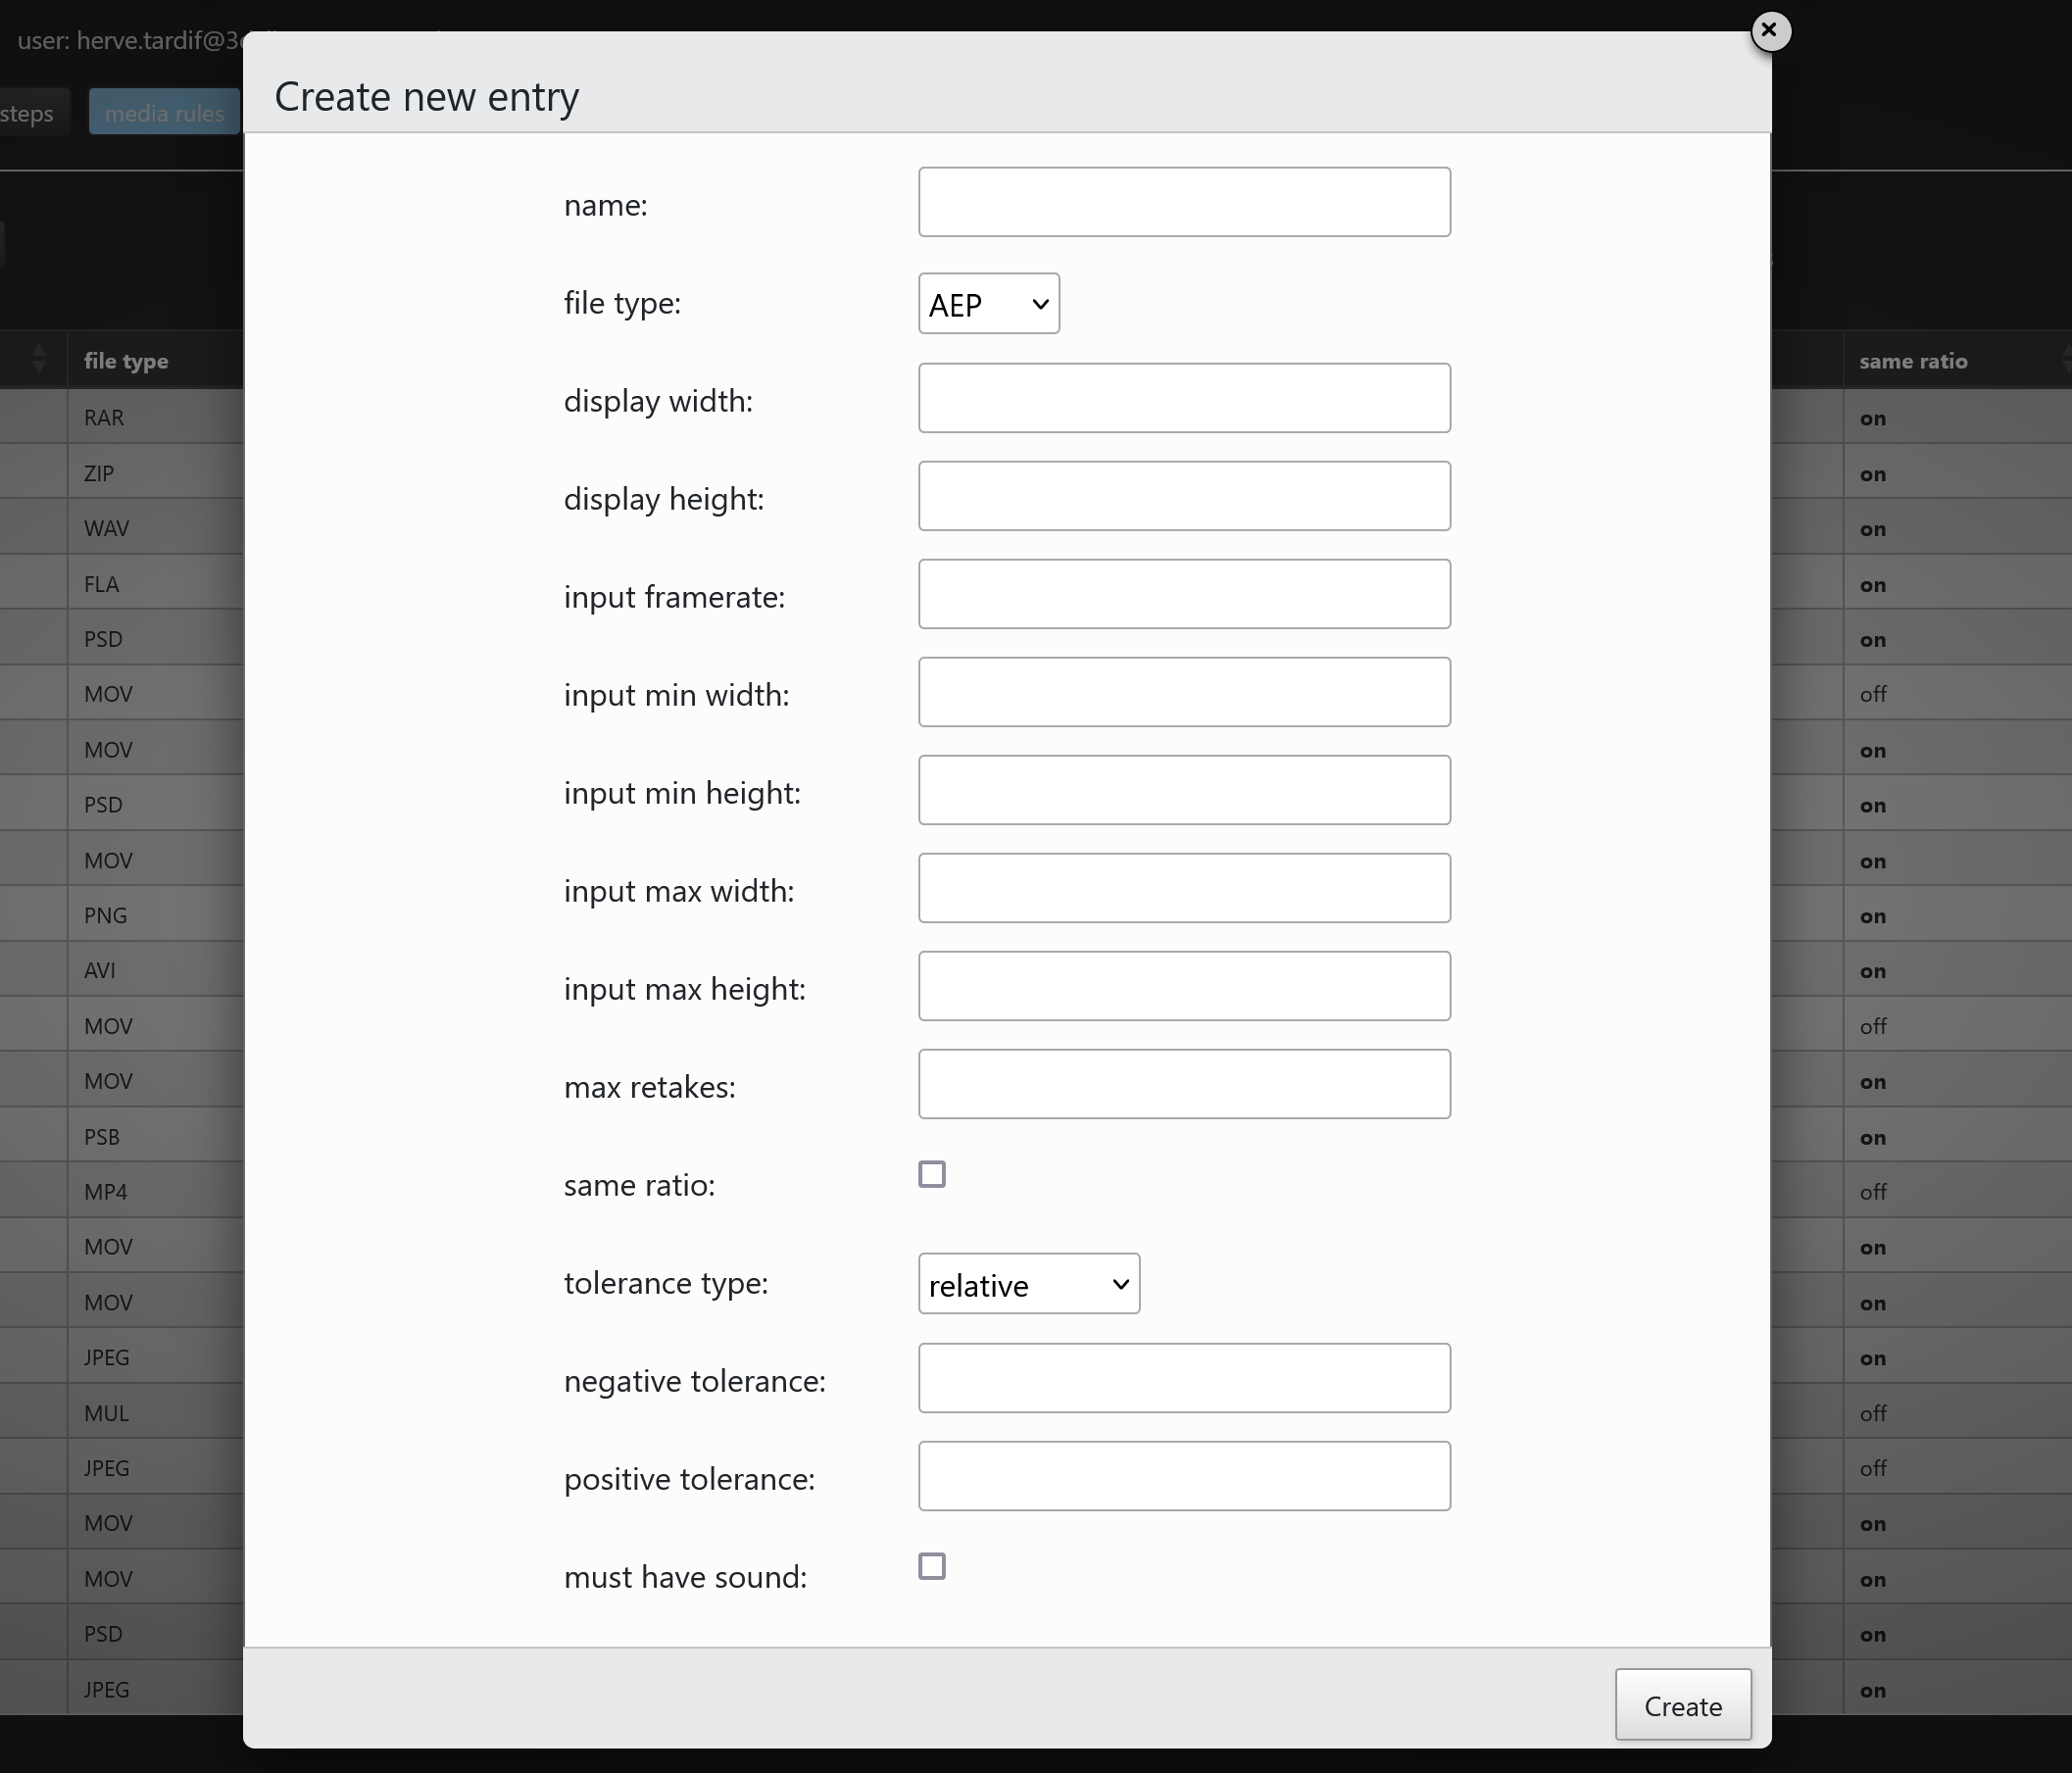
Media rules are created by specifying several parameters:
- the name of the rule
- the format/file type of the media (mp4, mov, avi, jpg, png etc.)
- the displayed resolution of the media in SPI
- the ratio of the submitted media (should it be the same as the displayed resolution?)
- the mininum and maximum resolution of the submitted media
- the framerate
- the maximum number of retakes
- the timing tolerance type (absolute or relative)
- the number of frames above or below the timing reference
WARNING
The timing tolerance is used for episodic shots only and the timing reference is the timing defined by the edl for that episodic shot that is to say it is the duration of that shot at the animatic step.
If you use the relative tolerance type and you specify a negative tolerance of 2 and a positive tolerance of 10, this means that shots submitted with a duration shorter than their animatic version by 2 frames or larger than their animatic version by 10 frames will be rejected and a message specifying the timing error will be thrown in the task history page.
The New button allows you to create a new media rule:
The following formats are currently supported by SPI:

# Defining organisation rights
This section will let you define the permissions to access episodes and steps per organisation.
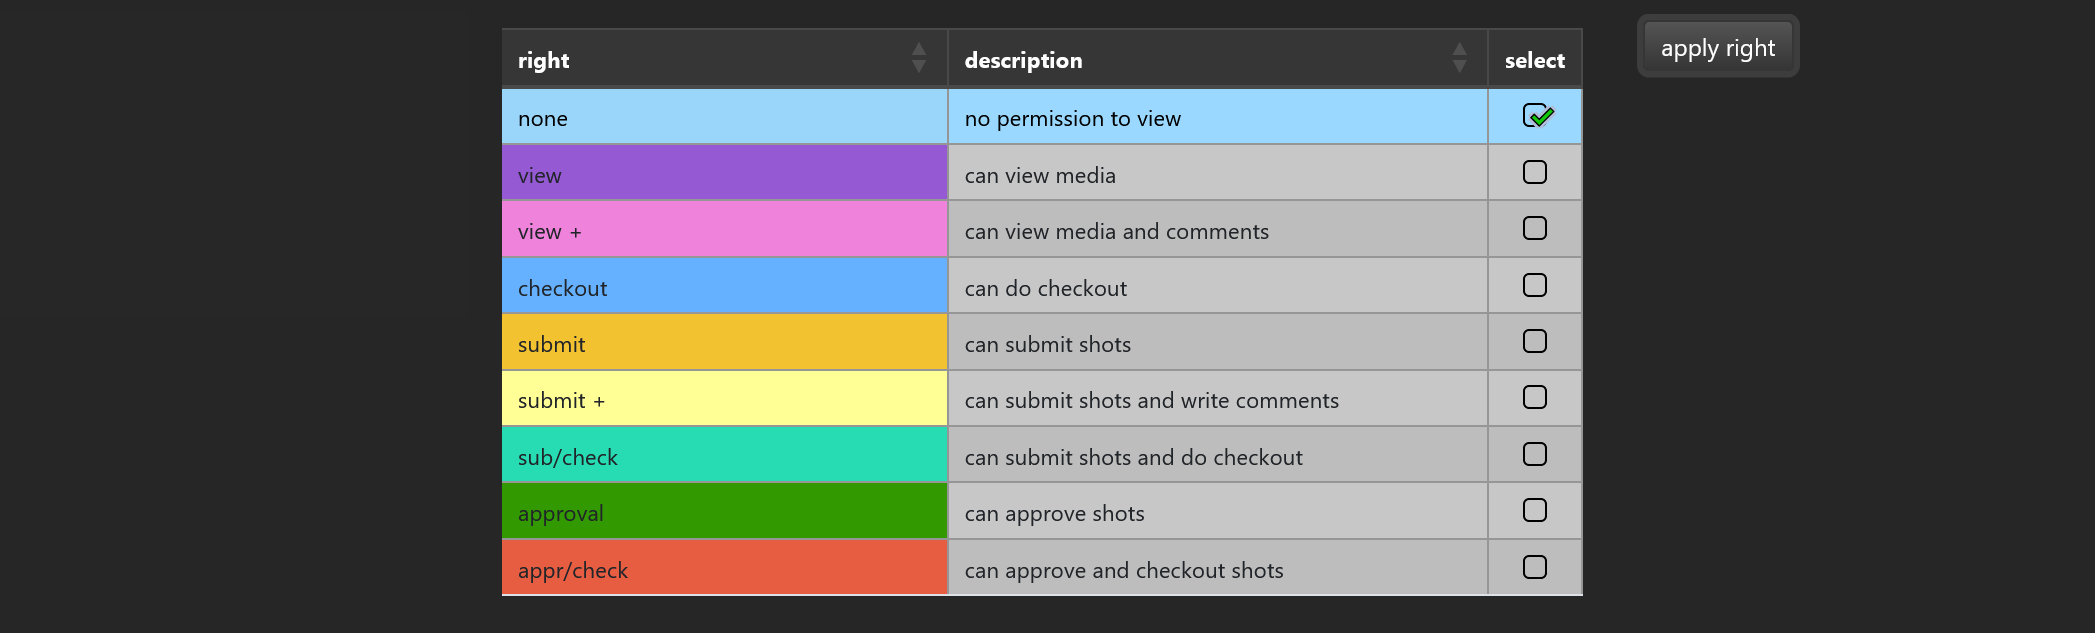
Each organisation has its own set of permissions to access episodes and steps ranging from no access at all to full access. Permission to access an episode or a step can be any of the following:
- no permission to view
- permission to view media
- permission to view media and comments
- permission to do checkout
- permission to submit elements
- permission to submit elements and to write comments
- permission to submit elements and to do checkout
- permission to approve elements
- permission to approve elements and to do checkout
For each selected organisation, you now can apply a right from the above list on a 2d table consisting of episodes on one axis and steps on the other:
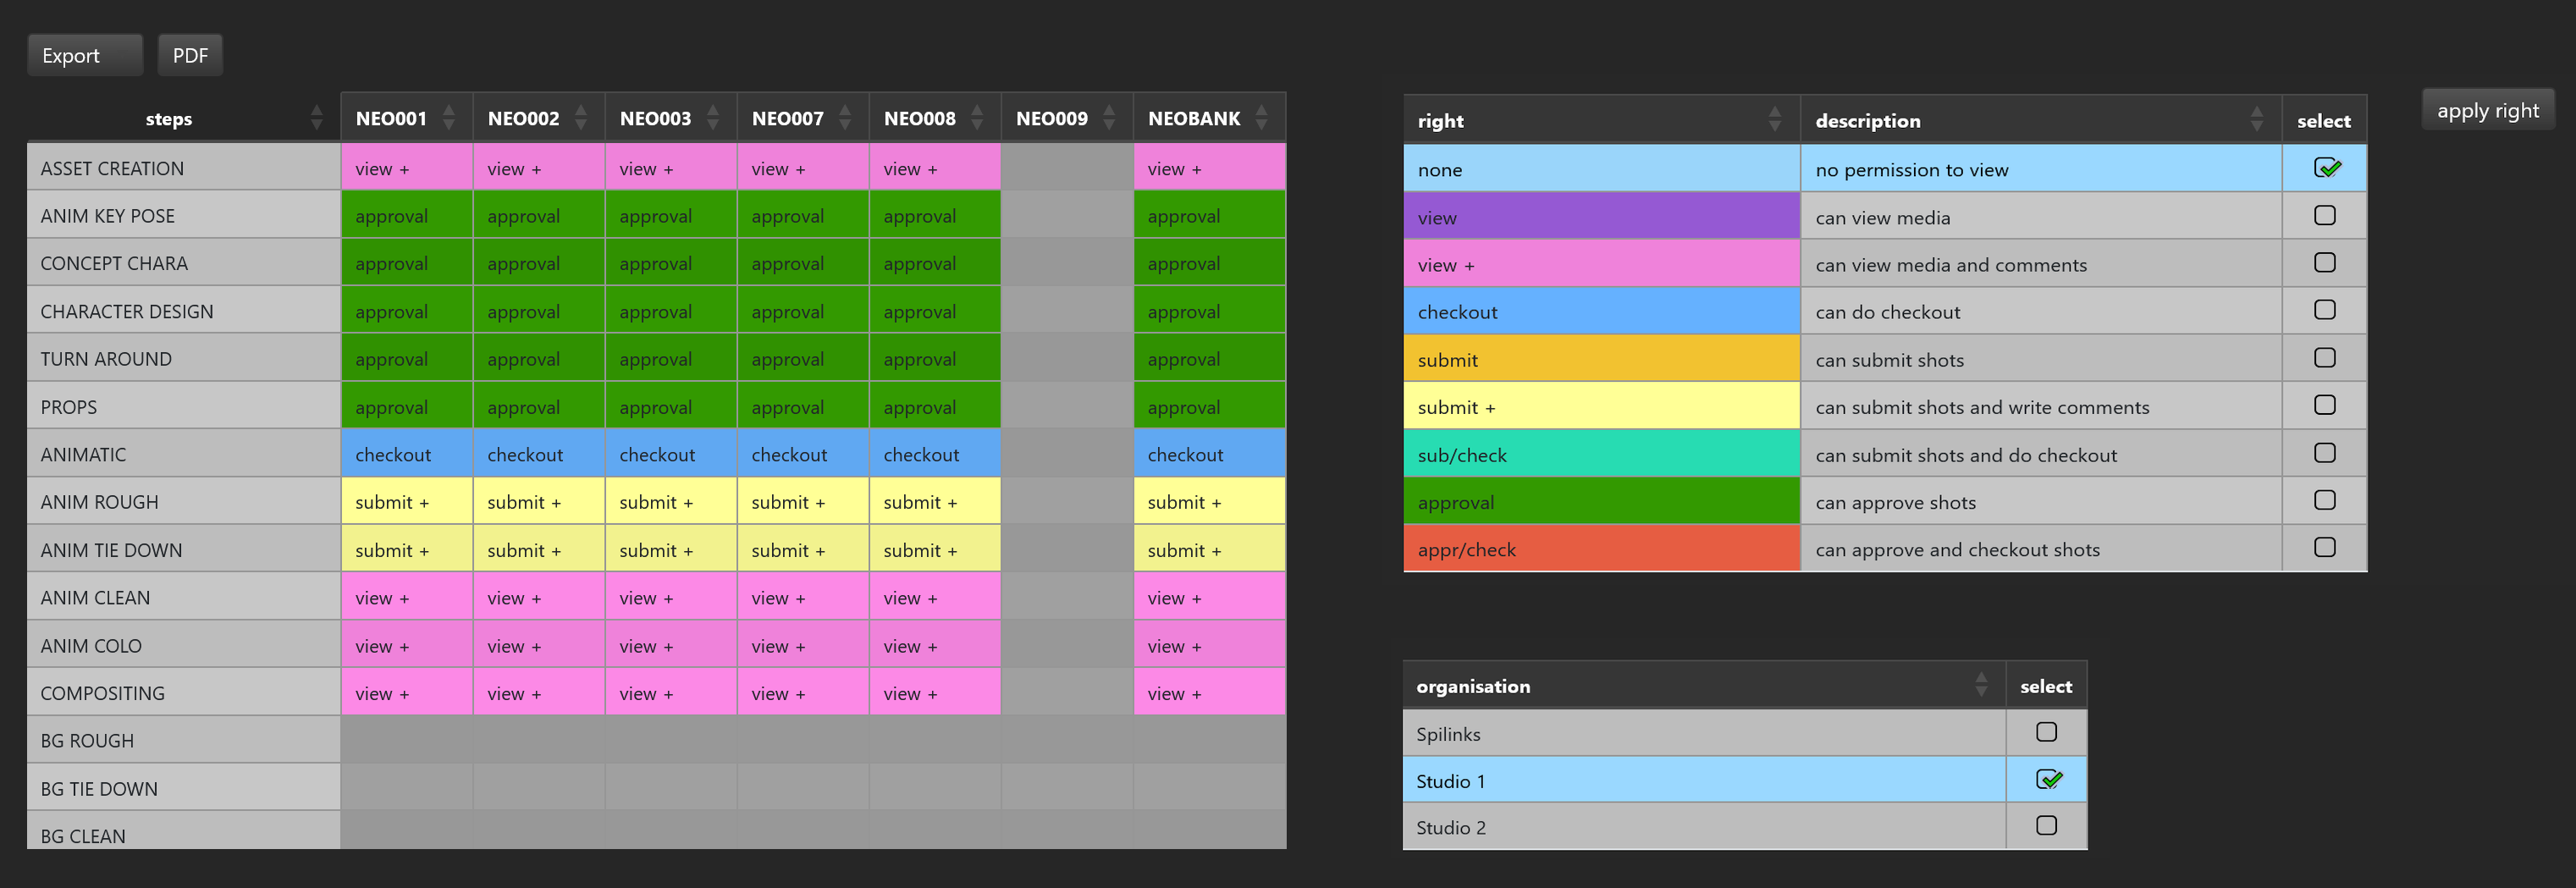
In order to set the rights for an organisation:
- select the organisation in the organisation table
- select the steps and sequences you want to apply the right to
- select the right then hit the
apply rightbutton
You can use CTRL CLICK and MAJ CLICK to do multiple selections.
# Project settings
This is where you set project specific parameters:

The main parameters are:
- The project name which will appear on the SPI top navbar
- The framerate
- The prefix which will be used throughout the SPI interface and in the naming convention.